Tuesday, December 22, 2015

Easy Fudge

The renovations are nearing completion and I am overjoyed!  The walls are painted, the lights are on, the floors have been sanded and the tile work is almost done.  I can definitely see the light at the end of the tunnel!  Meanwhile, Christmas is almost here!  I like to make goodies to give away as gifts this time of year.  I think people enjoy cookies and fudge more than a generic candle or gift card.  I know I do.  Here is a very easy recipe for fudge.  You don't even need a candy thermometer!  It is downright decadent.  If you need something easy to make for a party or to give as a gift, this is it.


EASY FUDGE

3 cups semi sweet chocolate chips
1 can condensed milk
1/2 cup chopped nuts (pecans, almonds, walnuts, etc)
1  tsp pure vanilla extract
1/4 tsp almond extract*
dash of salt

*If you don't have almond extract don't worry, just use 1 1/4 tsp of vanilla extract.

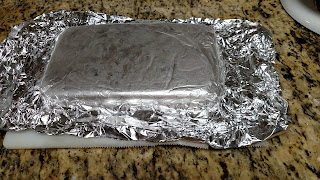
Line an 8x12 inch baking dish with foil.  Here's a trick that makes it easy:  Turn the dish over and mold the foil to the outside of the dish.


Then, remove it, flip the dish over and sit it right in the dish.


So much easier!  Next grease the foil with a little butter or nonstick cooking spray.


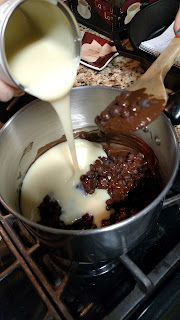
In a heavy saucepan over LOW heat, melt the chocolate chips with the condensed milk, stirring frequently (if you don't stir it often it will burn and keep it on low heat!).


Once it is melted and smooth, remove from the heat and add the dash of salt.


 Add the extracts.


Add the chopped nuts.  I used almonds.


Mix well and pour into the buttered foil-lined dish.


Spread it out evenly.


Put it in the fridge to chill at least an hour (I like to let it chill overnight if I have the time).

Once chilled and set, put a cutting board (lined with wax paper for easy clean up) over the dish and flip upside down.  Remove the dish and set aside, then carefully peel off the foil.


Cut into small squares.  You can cut them any size you want.  The fudge is very rich so I like to cut them into small pieces.


See how easy this was to make?  No cooking the fudge to the proper temperature and all that jazz.  Simple and quick but with a great result.  I love a recipe like that!  If you don't like nuts or have an allergy, you can use mini marshmallows instead or chopped Oreos or chopped candy, etc.

I hope you give this a try.  Your family and friends will appreciate it, trust me.  Merry Christmas!

Saturday, December 19, 2015

Christmas Shortbread Cookies

As Christmas fast approaches, I am still in a house of renovating madness.  Every morning I am greeted by the lovely sounds of saws and nail guns.  It's a wonderful way to start the day, I highly recommend it (can you hear the sarcasm through the computer?).  Well, anyway, the holidays go on.  So, I will do what I do on every holiday, bake cookies.  Today, I'm talking about shortbread cookies.

I absolutely love shortbread cookies.  How could I not, they're basically butter and sugar?  Oh well, my philosophy is "I'd rather have a little something delicious than a lot of something diet".    These cookies fall into that category.  It's true, they're a splurge, but it is Christmastime after all, so splurge away!


CHRISTMAS SHORTBREAD COOKIES

1 stick unsalted butter, softened (leave out on the counter til soft)
1/4 cup sugar
1 tsp vanilla extract (pure, no imitation stuff here!)
1 cup all purpose flour
2 squares of white almond bark
Christmas sprinkles

Preheat oven to 350 degrees.

Using a mixer, cream the butter and sugar (that just means mix it on medium-high speed til it's fluffy).


Stir in the vanilla extract.

Next, add the flour and mix on medium low speed until combined.  You will see it start to form a dough.


Turn the dough out onto a surface covered with wax paper.  I use a cutting board or sometimes just my counter top.


Form the dough (using your very clean hands, aka the best tools you have) into a rectangle that's about a 1/4 inch thick.


Using a pizza cutter (or a knife), cut the dough in half vertically and then horizontally.


You'll have four sections.  Cut each section into thirds.  This will leave you with 12 rectangular cookies.


Use a fork to poke a few holes into the dough.  This is decorative, but it also helps the cookies rise evenly.


Gently place each cookie onto a baking sheet, leaving plenty of space between them (because they will spread while baking).


Bake for 12-15 minutes or until light golden brown around the edges.  Don't over bake these!


Let them cool a few minutes on the baking sheet, then transfer them to a rack to cool completely.  If you don't have a rack, don't sweat it.  Just take them off the hot baking sheet and put them on a cool one.  The rack just lets air circulate around the cookies so they cool faster.

Once the cookies are completely cooled, melt the almond bark.  I put it into a coffee mug and microwave it for 30 seconds, then stir.  If it's not totally melted, microwave it for another 15 seconds and stir again.  You want it to be fully melted and smooth.


Once the almond bark is melted, carefully dip each cookie to coat the end.  I say carefully because they are very delicate cookies and will break easily.  Just dip the end and then lay it on some wax paper and decorate with sprinkles (do it quickly because the almond bark starts to set up fast).


Let them sit until the almond bark sets, which doesn't take long.  If you don't want to dip them, you can drizzle the melted almond bark over the top and then decorate with sprinkles.

This recipe makes 12 cookies.  It is very easy to double if you want to make more.  Put these in a cellophane bag with a pretty ribbon and you've got a great hostess gift.

These are very festive and delicious!  A great Christmas cookie!


Sunday, December 13, 2015

Christmas Crafts Part 2

In my last post, I talked about easy and inexpensive Christmas Crafts that you can do with kids (or really fun grown ups).  Well, there are just so many that I decided to dedicate another post to these cheap and cheerful activities.


COFFEE FILTER SNOWFLAKES

white coffee filters
scissors

Flatten out the coffee filter.  Fold it half.


Fold it in half again.


Keep folding it half until it gets very small.


Using a sharp pair of scissors, cut out chunks from each side (including the pointed end and the edge).  You can get creative here, big, little, rounded, zig zag, any shape you like.


Once you are happy with your cuts, unfold the coffee filter to reveal your beautiful snowflake!


I love that each one you do is unique, just like real snowflakes, no two are alike.


What can you do with these?  You can hang them on your tree:


Tape them to a window:


Make a garland by stringing them on yarn and hang it up anywhere you want a little Christmas cheer.  These are super easy and a lot of fun to make!


MAGICAL REINDEER FOOD

oats
glitter
a small jar or ziploc bag

Mix the oats with some glitter.  Store it in a small jar or ziploc bag.  Sprinkle some out in the yard on Christmas eve for the reindeer.  This magical food helps them fly!


SNOWMAN POOP

mini marshmallows
small ziploc bag
paper and marker

Place some mini marshmallows in a small ziploc bag (I use the snack size bags).  Write this poem on a small piece of paper that will fit onto the bag (or print it out using your computer):

YOU BETTER NOT BE NAUGHTY OR HERE'S THE SCOOP
ALL YOU'LL GET FOR CHRISTMAS IS SNOWMAN POOP!


Snowman poop is always a big hit with the kids!


PASTA ORNAMENTS

A variety of dried pasta (ziti, shells, bowties, rotini, etc)
glue
paints
pipe cleaners
yarn or ribbon

These are really cute and easy.  Just put out a bunch of dried pasta and let your kids glue them together or string them on yarn or pipe cleaners to make ornaments.  After the glue dries you can paint them or just leave them plain.  Glue on a loop of yarn or ribbon to hang them on the tree.

I strung ziti on a pipe cleaner and formed it into a circle for a wreath shape:


Then I glued a piece of bowtie pasta on top.  Here it is plain:


Here it is painted:


I love love love these pasta ornaments!  They remind me of my Old School Italian Husband (pasta is a way of life with him ha-ha).

Anyway, I hope you make these simple Christmas crafts with your family (and make some memories while you're at it).  Merry Christmas!